Week 4 Year 3
SkullThis was week 4 placement and I was now at the Western General hospital. I always like working at the Western General hospital as the staff are very willing to teach and there is lots of opportunity to get of a plenty of hands on experience.
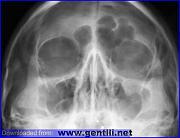
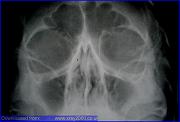
The whole week was very busy and I gained a lot of valuable experience in all aspects of the job. One examination that made me nervous was regarding a request for a patient that was due to have a Magnetic Resonance Imaging (MRI) scan. The request was to perform an orbits examination prior to him having his MRI scan due to the pre-MRI safety check, performed by the radiographer, highlighting that this patient had previously worked with metal.
I had performed an orbits exam in the past using a skull unit but was nervous about attempting it using an up-right bucky. This was due to my lack of experience in both using this equipment and being inexperienced at performing the an orbit exam. I discussed how I was going to attempt the examination with the radiographer and we agreed I would position the patient and she would check my positioning before I proceeded to complete the exam.
The basic orbits (OM) examination as stated by Carver and Carver (2006) is performed by;
• The patient seated in front of the image receptor, (this should help to ensure some stability to the patients’ posture and balance).
• The chin is placed in contact with the midline of the image receptor and the chin position adjusted until the Orbitalmeatal Baseline (OMBL) has been raised 30˚ from the horizontal plane.
• The Medial Sagital Plane (MSP) is perpendicular to the image receptor, which is assessed by checking that the External Auditory Meatus (EAMs) or lateral margins are equidistant from the image receptor.
• Centre above the External Occipital Protuberance (EOP) to emerge level with the middle of the orbits.
• Collimate to include the orbits and maxillary sinuses.
The examination was actually straight forward and once I had had time to reflect on it then it was relatively easy. The initial fear came from trying to adapt an exam that I had previously only performed using a skull unit to performing the exam on an upright bucky. On reflection, the examination was actually easier using an upright bucky than it was using the skull unit as there was less to think about in terms of positioning the cassette and the positioning angle of the skull unit.
When positioning for any examination of the skull or facial bones it is important the patient is perfectly straight with no rotation or tilt. Common errors in positioning are caused when the MSP is not parallel to the cassette and the interpupilary line is not at 90Ëš to the film. Positioning errors can be reduced by using the eyes rather than the nose as positioning aids as it is recognised that the human body is not always symmetrical.
I have very little experience in head/skull radiography and still find it intimidating and challenging especially when trying to interpret skull images. I feel from a students’ perspective it is difficult to fully understand positioning techniques from the text books. I feel observing examinations being performed and having hands on experience in all aspects of these examinations is extremely important in all types of skull examinations. However demand for plain film imaging of the head/skull has been reduced greatly due the introduction of Computed Tomography (CT) and Magnetic Resonance imaging MRI.
Attached to this piece of writing are images of a skull unit and images and diagrams of the skull taken from; http://www.e-radiography.net.
Clark, K.C. 2005. Clarks positioning in radiography. 12th ed. London: Arnold.
 Print This Post

